So you need to know how to clean thermal paste off the cpu? If so, you’ve come to the right place. In this blog post, we’ll give you a step-by-step guide on how to do just that. We’ll also provide some guidance on what kind of thermal paste to use and why it’s important to keep your cpu clean. So if you’re ready to learn more about how to clean thermal paste off cpu, read on!
What is thermal paste?
Thermal paste is a substance that helps to fill in the microscopic gaps between a CPU and its heat sink. By filling in these tiny gaps, thermal paste helps to improve the overall conductivity of heat between the two surfaces, which helps to keep the CPU cooler.
However, over time, thermal paste can become dried out or contaminated, which can reduce its effectiveness. In some cases, it may even be necessary to completely remove and replace the thermal paste on a CPU.
If you’re not sure whether or not your thermal paste needs to be cleaned or replaced, here are a few signs to look for:
- Your CPU is running hotter than usual
- There is visible residue or buildup on your CPU or heatsink
- Your CPU cooler is making strange noises
If you notice any of these signs, it’s likely time to clean or replace your thermal paste. Here’s a quick guide on how to do so:
1. First, you’ll need to remove your CPU from its socket. Refer to your motherboard’s manual for instructions on how to do this.
2. Next, you’ll need to remove the heatsink from your CPU. Again, refer to your motherboard’s manual for instructions on how to do this properly.
3. Once the heat sink is removed, you should be able to see the thermal paste that’s currently applied to your CPU. Using a putty knife or other similar tool, gently scrape off as much as you can.
The purpose of thermal paste
Thermal paste is used to conduct heat from the CPU to the heatsink. If there is too much or too little thermal paste, it can cause overheating and damage to the CPU. It is important to apply the correct amount of thermal paste to the CPU to ensure proper cooling.
Applying thermal paste
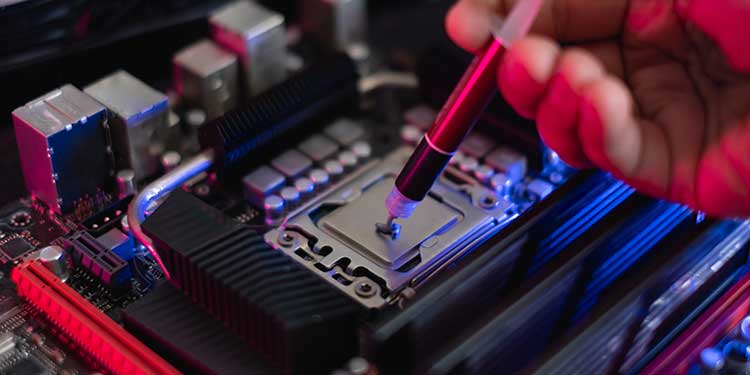
When it comes to applying thermal paste, more is not always better. You only need a pea-sized amount in the center of your CPU. If you have too much, it can actually impede heat transfer and cause your PC to overheat.
To apply the paste, remove the CPU cooler from your PC (if you have one installed) and unscrew the retention plate or bracket. Carefully remove the protective cover from the bottom of the CPU without touching any of the exposed metal or circuitry.
Once the cover is off, locate the thermal paste application area in the center of the chip. If there’s already some paste on there, clean it off with a lint-free cloth and 99% isopropyl alcohol or rubbing alcohol.
Now it’s time to apply fresh thermal paste. Again, only use a pea-sized amount in the middle of the chip. You can use your finger or a credit card to spread it out into an even layer. Be careful not to get any paste on any of the exposed circuitry around the edge of the chip.
Once you’ve applied enough thermal paste, carefully put everything back together again and boot up your PC. Check that all your fans are running properly and keep an eye on your temperatures to make sure they aren’t running too high.
How to clean your cpu
If you’ve decided to know how to clean thermal paste off cpu, there are a few things you’ll need to do in order to ensure that the job is done properly. First, you’ll need to gather some supplies. You’ll need rubbing alcohol, cotton swabs, and a lint-free cloth. You’ll also need to make sure that you have a well-ventilated area to work in.
Once you have all of your supplies, the next step is to remove the cpu from your computer. Refer to your computer’s manual for specific instructions on how to do this. Once the cpu is removed, you can begin cleaning it.
Start by using the rubbing alcohol and cotton swabs to remove any excess thermal paste from the surface of the cpu. Be sure to use gentle pressure and strokes so as not to damage the surface of the cpu. Once all of the excess paste has been removed, you can move on to cleaning the sides of the cpu with the lint-free cloth.
Again, use gentle pressure and strokes when cleaning the sides of the cpu. You don’t want to damage any of the delicate components inside.
There are a few signs that you might need to replace your thermal paste:
Your computer is overheating. If your computer is regularly overheating, it could be because the thermal paste is no longer effective at conducting heat away from the processor.
Your CPU temperatures are higher than usual. If you’re monitoring your CPU temperatures and you notice that they’re consistently higher than they used to be, it’s likely that the thermal paste needs to be replaced.
There are visible cracks in the thermal paste. If you can see cracks or gaps in the thermal paste, it’s no longer doing its job properly and needs to be replaced.
The thermal paste has changed color. If the thermal paste has changed color from its original white (or off-white) color, it’s probably time to replace it.
If you’re not sure whether or not the thermal paste needs to be replaced, err on the side of caution and replace it anyway. It’s a relatively inexpensive fix that could save your processor from damage due to overheating.
Replacing thermal paste
If you are looking to replace the thermal paste on your cpu, there are a few things you need to keep in mind. First, you’ll need to purchase some high quality thermal paste. This can be found at most electronic stores or online. Next, you’ll need to remove the old thermal paste from your cpu. To do this, you can use a cotton swab and some isopropyl alcohol. Once the old thermal paste has been removed, you’ll need to apply the new thermal paste. To do this, simply follow the instructions that come with your thermal paste. Once the new thermal paste has been applied, you’ll need to reassemble your cpu and reinstall it into your computer.
Conclusion
Cleaning off old thermal paste can be a pain, but it’s worth it to ensure that your CPU is running as efficiently as possible. By following the steps outlined in this article, you should have no trouble getting rid of the old thermal paste and applying a fresh layer. As always, be sure to consult your motherboard’s manual for specific instructions on how to apply thermal paste to your CPU. Thanks for reading!
Read More: Best Cpu Cooler for i7 8700k
Best Cpu Cooler for Ryzen 9 7900x
Lucas Noah, armed with a Bachelor’s degree in Information & Technology, stands as a prominent figure in the realm of tech journalism. Currently holding the position of Senior Admin, Lucas contributes his expertise to two esteemed companies: OceanaExpress LLC and CreativeOutrank LLC. His... Read more