When it comes to managing a network of computers, understanding how to increase the SCCM client cache size is crucial. System Center Configuration Manager (SCCM), a Microsoft software management suite, allows users to manage large groups of computers running on Windows. One of its features includes the client cache, which stores temporary files needed for installing applications, software updates, and operating system deployments.
However, you may occasionally find the need to adjust the cache size for SCCM clients. Whether it’s because you’re dealing with large packages or you simply want to optimize performance, knowing how to fine-tune this aspect of SCCM can be a game-changer. In this guide, we will dive into the steps of SCCM client cache size adjustment, ensuring you have all the knowledge you need to effectively manage your network.
Table of Contents
Pre-requisite

Before we delve into how to increase the SCCM client cache size, there are a few prerequisites you need to understand to make the SCCM client cache size adjustment process seamless.
Firstly, you should have basic knowledge of SCCM and how it operates. Familiarity with its interface will greatly expedite the process. Secondly, you should have the necessary administrative rights to make changes in SCCM. Adjusting cache size for SCCM clients is a sensitive operation that may require administrator-level permissions.
Lastly, ensure that you understand the implications of increasing the cache size. While a larger cache can accommodate bigger packages, it also takes up more disk space. Therefore, you should balance the need for larger cache size with the available disk space on your machines.
With these prerequisites in place, you are ready to learn how to increase the SCCM client cache size. The aim is to fine-tune your network’s performance by optimizing the client cache size based on your unique needs.
How to increase SCCM client cache size
Accessing the Configuration Manager
Before we delve into how to increase SCCM client cache size, it’s essential to know how to access the Configuration Manager. This is the console where you will make all SCCM client cache size adjustments.
The Configuration Manager is a powerful tool that lets you manage settings and properties related to your SCCM client, including adjusting cache size for SCCM clients. Let’s take a look at how to access it.
- Navigate to the “Start” menu on your machine, then proceed to “All Programs.”
- Look for the “Microsoft System Center” option and expand it.
- Here, you will find the “Configuration Manager” option. Click on it to open the Configuration Manager console.
- Once you’re in the console, you will be able to view and manage the various settings and properties related to your SCCM client.
By accessing the Configuration Manager, you’re one step closer to successfully increasing your SCCM client cache size. The adjustments you make will allow for more efficient usage of the client cache, especially when dealing with large packages.
Finding the Cache Tab
Before you embark on the journey of how to increase the SCCM client cache size, it’s important to first know where to locate the cache settings. The cache tab is situated in the Configuration Manager located on your client machine. This tab gives you the ability to view and manage your cache size, making SCCM client cache size adjustment a straightforward process.
To find the cache tab, follow these steps:
- Open the “Control Panel” on your computer.
- Navigate to “System and Security”.
- From the list, select “Configuration Manager”.
- In the Configuration Manager Properties window, click on the “Cache” tab.
At this point, you should now be in the Cache tab of the Configuration Manager, ready to adjust the cache size for SCCM clients. The next steps will guide you through this process, ensuring you effectively increase your SCCM client cache size to meet your needs.
Adjusting the SCCM Client Cache Size
When we delve into the realm of increasing the SCCM client cache size, it’s essential to understand the basic process. This aspect of ‘how to increase the SCCM client cache size’ involves a few key steps that require careful attention. By adjusting the cache size for SCCM clients, you can ensure that larger packages are accommodated effectively, and the overall performance of your network is optimized.
Here are the ordered steps to adjust the SCCM client cache size:
- Access the Configuration Manager: Click on the Start menu, type ‘Configuration Manager’ in the search bar, and select it from the list of results. The Configuration Manager Properties window will open.
- Find the Cache Tab: In the Configuration Manager Properties window, find and click on the ‘Cache’ tab. This tab allows you to view and change the client cache settings.
- Adjust the SCCM Client Cache Size: On the Cache tab, you will see a slider or input field (depending on your SCCM version) labeled ‘Size (MB)’. You can adjust this to increase or decrease the cache size. Make sure you increase the size depending on the requirement of your network and the packages that you need to manage.
By following these steps, you can successfully perform an SCCM client cache size adjustment, ensuring that your client cache is always tailored to your network’s needs.

Verifying the Changes
After executing the steps to increase the SCCM client cache size, it’s crucial to ensure that the changes have been successfully implemented. This process, known as verifying the changes, is an essential part of the SCCM client cache size adjustment. Following through with this step will give you the confidence that your adjustments are in effect and working as intended for the SCCM clients.
Ordered Steps:
- Open the Configuration Manager: Start by opening the Configuration Manager on your system. This is where all the SCCM client settings, including the cache size, are managed.
- Access the Cache Tab: Navigate to the cache tab within the Configuration Manager. This is where you can view the current cache size.
- Check the Current Cache Size: The cache size will be displayed in MB (megabytes). Compare this value with the size you set while adjusting the cache size for SCCM clients.
- Check Disk Space: You can also verify the changes by checking the disk space. The available disk space should decrease by the amount you’ve increased the SCCM client cache size.
- Run a Test: Finally, a practical way to test out the changes is by running an SCCM task that would require more cache than was previously available. If the task runs smoothly, then you’ve successfully increased the SCCM client cache size.
By following these steps, you can easily verify whether your attempts on how to increase SCCM client cache size have been successful.
class="wp-block-heading" id="vb-script-to-modify-sccm-client-cache-size">VB script to modify SCCM client cache size
When dealing with SCCM client cache size adjustment, an effective method is to use VB script. This approach gives you granular control over how to increase SCCM client cache size, making it an ideal choice for IT professionals and system administrators. Using a VB script not only provides a more automated process but also reduces the likelihood of errors that may arise when adjusting cache size for SCCM clients manually.
Here are the ordered steps to modify the SCCM client cache size using a VB script:
- Begin by opening a new Notepad file.
- Copy and paste your VB script into the Notepad file.
Please note, the script should contain the commands necessary to adjust the SCCM client cache size. - Save the Notepad file with a .vbs extension. For example, you might name it “IncreaseSCCMCache.vbs”.
- Run the .vbs file on the SCCM client machine. You can do this by right-clicking the file and selecting “Run as administrator”.
- The VB script will now execute, adjusting the SCCM client cache size as per the specifications in the script.
Remember, always make a backup before you run the script, and test it out on a single machine before applying it to all your SCCM clients.

PowerShell script to modify SCCM client cache size
Increasing the SCCM client cache size does not always have to be a manual task; it can also be automated. Leveraging the power of scripting, particularly with PowerShell, makes SCCM client cache size adjustment a breeze. This scripting method enables network administrators to handle large volumes of adjustments quickly and efficiently. So, let’s delve into how to increase SCCM client cache size using a PowerShell script.
Ordered Steps:
- First and foremost, launch the PowerShell application on your computer. Ensure you run it as an administrator for the necessary privileges.
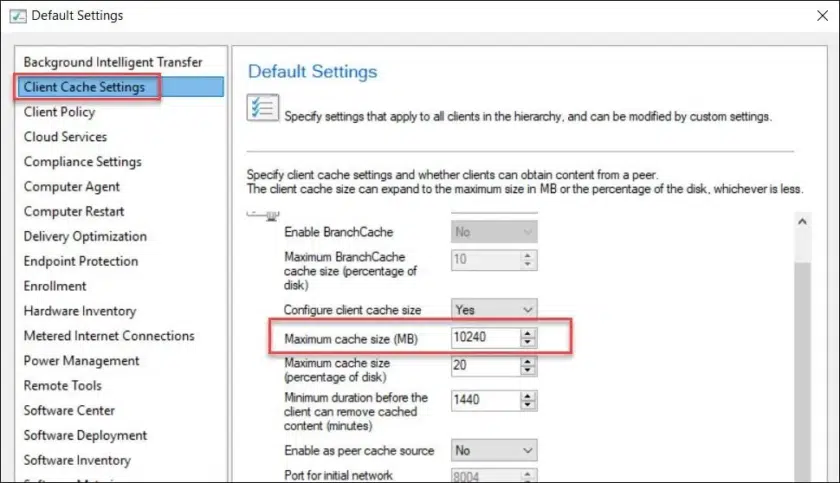
- Prepare your script by defining the new SCCM client cache size. Here is a basic example of how your script should look:
$CacheSize = 10240
$SCCMClient = [wmiclass]"\\localhost\ROOT\ccm:SMS_Client"
$SCCMClient.SetCacheSize($CacheSize)
In this example, we are setting the SCCM client cache size to 10240 MB, or 10 GB. You can replace “10240” with the desired cache size.
- Save your script with a
.ps1extension—for example,IncreaseSCCMCache.ps1. - To run the script, right-click on it and select “Run with PowerShell.” This will execute the script, thereby adjusting the cache size for the SCCM clients.
- Finally, verify the changes by checking the cache size on your SCCM client.
By following these steps, you can easily automate the process of increasing the SCCM client cache size, saving you time and ensuring consistency across your network.
Change the client cache size on a single machine
Managing a network of computers using System Center Configuration Manager (SCCM) often requires knowing how to increase the SCCM client cache size on individual machines. This is particularly important when dealing with large software packages or optimizing performance. In this segment, we’ll provide a detailed guide on adjusting the cache size for SCCM clients on a single machine.
Ordered Steps:
- Begin by opening the ‘Configuration Manager’ on the client machine. You can find this in the ‘Control Panel’ under the ‘System and Security’ category.
- Once the ‘Configuration Manager Properties’ window opens, navigate to the ‘Cache’ tab.
- Here, you’ll see the current cache size. To adjust it, click on the ‘Configure Settings’ button.
- In the new window that pops up, check the box that says ‘Enable BranchCache’. This will allow you to manually set the cache size.
- Enter the desired cache size in the ‘Amount of disk space to use’ field. The value you enter here depends on your specific needs and the capacity of your machine.
- Click ‘OK’ to save the changes. You’ve now successfully adjusted the SCCM client cache size on a single machine.
Remember to verify the changes and ensure the new cache size is adequate for your requirements. With this guide, increasing the SCCM client cache size becomes a straightforward task.
Tips and Warnings

When working on how to increase the SCCM client cache size, it’s important to keep a few things in mind:
- Plan before you proceed: Before you start the SCCM client cache size adjustment process, assess your network’s requirements. Overestimating the cache size can lead to wastage of disk space, while underestimating can lead to failed deployments.
- Understand the limits: The default cache size is 5120 MB, and the maximum you can set is 100000 MB. Don’t try to exceed this limit, as it may lead to unexpected issues.
- Think about the impact on the system: Increasing the cache size means taking up more disk space. Ensure the client machine has enough space to accommodate the increased cache size.
- Keep track of changes: Always keep a record of the original settings before making any changes. This can be useful if you need to revert back to the original configuration.
- Use scripts wisely: While VB and PowerShell scripts can help in adjusting cache size for multiple SCCM clients simultaneously, they should be used carefully. Improper use can lead to system-wide issues.
- Be patient: After increasing your SCCM client cache size, it might take some time for the changes to take effect. Do not rush the process.
Always remember, that adjusting cache size for SCCM clients is a powerful tool in managing your network, but it should be done thoughtfully and carefully.
Troubleshooting
Troubleshooting is an integral part of knowing how to increase SCCM client cache size. Sometimes, even after adjusting cache size for SCCM clients as per the steps outlined, you may run into some issues. Here, we will address two common problems that you might face during or after the SCCM client cache size adjustment process.
- If the Cache Size Doesn’t Change
Firstly, you might find that the cache size doesn’t change even after you’ve followed the steps to increase it. This could be due to a number of reasons, from insufficient permissions to software glitches. - If the Cache Size is Too Small to Accommodate a Package
Secondly, you might encounter a situation where despite adjusting the SCCM client cache size, it is still too small to accommodate a package. This could happen if the package size is larger than the maximum cache size or if the cache is full of other cached content.
In the next sections, we will delve into these issues in depth, providing solutions and tips to help you effectively increase and manage your SCCM client cache size.
Conclusion
In conclusion, understanding how to increase SCCM client cache size is a fundamental aspect of managing a network of computers using Microsoft’s System Center Configuration Manager. By going through the steps we’ve outlined in this guide, you can easily perform SCCM client cache size adjustment and optimize your network’s performance.
Adjusting cache size for SCCM clients may seem like a daunting task at first, but with the right knowledge and tools, it becomes a straightforward process. Remember, the key is to ensure that you have enough cache space to accommodate your largest packages, but not so much that it takes up unnecessary disk space. We hope this guide has been helpful in giving you the confidence to manage your SCCM client cache size effectively.
Frequently Asked Questions
What is the maximum cache size in SCCM client?
The maximum cache size in the SCCM client is 100GB. This limit has been set by Microsoft to prevent the cache from occupying too much disk space. However, understanding how to increase SCCM client cache size effectively can help you manage your network more efficiently for larger packages.
What is the default cache size for SCCM client?
The default cache size for the SCCM client is 5120 MB or 5 GB. This size is generally sufficient for most applications and updates. However, for larger packages, you might need to perform an SCCM client cache size adjustment.
What is SCCM client cache?
SCCM client cache is a component of the SCCM client that stores temporary files required for installing applications, software updates, and operating system deployments. This cache is essential for the smooth functioning of SCCM.
Can I adjust the cache size of SCCM client?
Yes, you can adjust the cache size of the SCCM client. There are several methods to do this, including using the Configuration Manager, VB scripts, or PowerShell scripts. Adjusting cache size for SCCM clients can be beneficial, especially when dealing with larger packages.
Are there benefits to increasing SCCM client cache size?
Definitely, increasing the SCCM client cache size can provide several benefits. It allows larger packages to be downloaded and installed without issues. It can also improve the performance of the SCCM client, especially if the default cache size is proving to be too small.
Is there a limit to how much I can increase SCCM client cache size?
Yes, the maximum limit for increasing the SCCM client cache size is 100GB. It’s important to increase the cache size cautiously, as it can occupy disk space and potentially slow down the system if set too high.
What happens if the SCCM client cache size is too small to accommodate a package?
If the SCCM client cache size is too small to accommodate a package, the download or installation of that package will fail. This is why it’s crucial to learn how to increase SCCM client cache size, especially if you’re frequently dealing with larger packages.
Read More:
- How to clear cache on LG smart TV
- Unlock Secure Folder To Get Notifications
- Z Flip 3 Screen Protector Crack
- Easy Guide to Fix Microsoft Teams Connection Issues
Greetings, fellow explorers of the digital realm! I’m Deshani Dananjana, a wordsmith with a flair for technology and a passion for storytelling. Armed with a Diploma in English, a Diploma in IT, and a Certificate in Graphic Design, I bring a unique blend of linguistic and visual skills to t... Read more