Replacing your old Hard Disk Drive (HDD) for a faster Solid State Drive (SSD) is a common practice among Windows users seeking improved system performance. While SSDs may not match the large storage capacity of HDDs, they offer speed benefits. However, due to their limited space, users often encounter low disk space warnings after a few months of use. Consequently, it’s not uncommon for Windows users to buy a new SSD and transfer their data from the old one. In this article, we will share the necessity to clone SSDs to another SSDs and the stepwise guide for cloning as well.
Why clone SSDs to SSDs?
Cloning an SSD (Solid State Drive) to another SSD can be done for various reasons, and it typically involves duplicating the entire contents of one SSD onto another. Here are some common reasons for cloning an SSD to another SSD:
1. Upgrade to a Larger SSD: If you have outgrown the capacity of your current SSD and want to upgrade to a larger one, cloning allows you to transfer all your data, including the operating system, applications, and files, to the new SSD without reinstalling everything.
2. Faster Performance: Upgrading to a faster SSD model can result in improved read and write speeds. Cloning allows you to migrate to a faster SSD without the need for a clean installation.
3. Backup and Redundancy: Creating a clone of your SSD provides a backup of your entire system. In case the original SSD fails or encounters issues, you can quickly swap it with the cloned SSD, minimizing downtime.
4. System Migration: If you are transitioning to a new computer or want to move your existing system to a different SSD, cloning is a convenient way to replicate everything from one drive to another.
5. Data Transfer: Cloning is often used to transfer data from an old SSD to a new one when upgrading hardware. This ensures that all data, settings, and configurations are preserved.
Preserving Software Configurations: If you have a well-configured system with specific software settings and preferences, cloning allows you to maintain those configurations on the new SSD.
Above are the common reasons, maybe you have others. So in the next part we will share the way to clone SSD to SSD on Windows 10.
How to clone SSD to another SSD on Windows 10
It’s unfortunate that windows does not offer built-in cloning utility. In other words, if you want to clone SSD to another SSD, a third-party tool is needed. Some top-rated tool like AOMEI Backupper is recommended, which was recognized as the best SSD cloning software in the market for Windows 11/10 and other PC operating systems. Whether you’re on Windows 7, 8, etc., AOMEI Backupper offers seamless cloning with the following key features:
1. Disk Clone: Clone your entire hard drive, including the ability to transfer from a smaller drive to a larger one or vice versa, focusing on used sectors for efficient use of space.
2. System Clone: Transfer only the operating system from HDD to SSD or between SSDs, saving time and storage space compared to Disk Clone.
3. Partition Clone: Clone specific partitions like NTFS, FAT32, exFAT, and more, providing flexibility in copying.
4. SSD Alignment: Optimize the reading and writing speed of the cloned SSD while extending its lifespan through partition alignment.
5. Wide Compatibility: AOMEI Backupper supports a variety of SSD brands and models, including Samsung, PNY, WD SSD, SATA, M.2 NVMe SSD, ensuring compatibility with different types of SSDs.
Ready to give it a try? Download and install AOMEI Backupper on your PC, and then follow the detailed steps for cloning SSD to SSD in Windows 11/10 in the next section.
Stepwise guide on cloning SSD to another SSD via AOMEI Backupper
Important Note: Remember that the destination SSD will be overwritten during the cloning process. If there’s crucial data on it, ensure you backup files before proceeding. Follow the instructions below to clone Windows 11/10 to a larger SSD using AOMEI Backupper:
Step 1: Connect Target SSD
Connect the target SSD to your computer and ensure it is detected. You can connect it internally in an additional drive bay or externally via a SATA-to-USB cable or a hard drive enclosure.
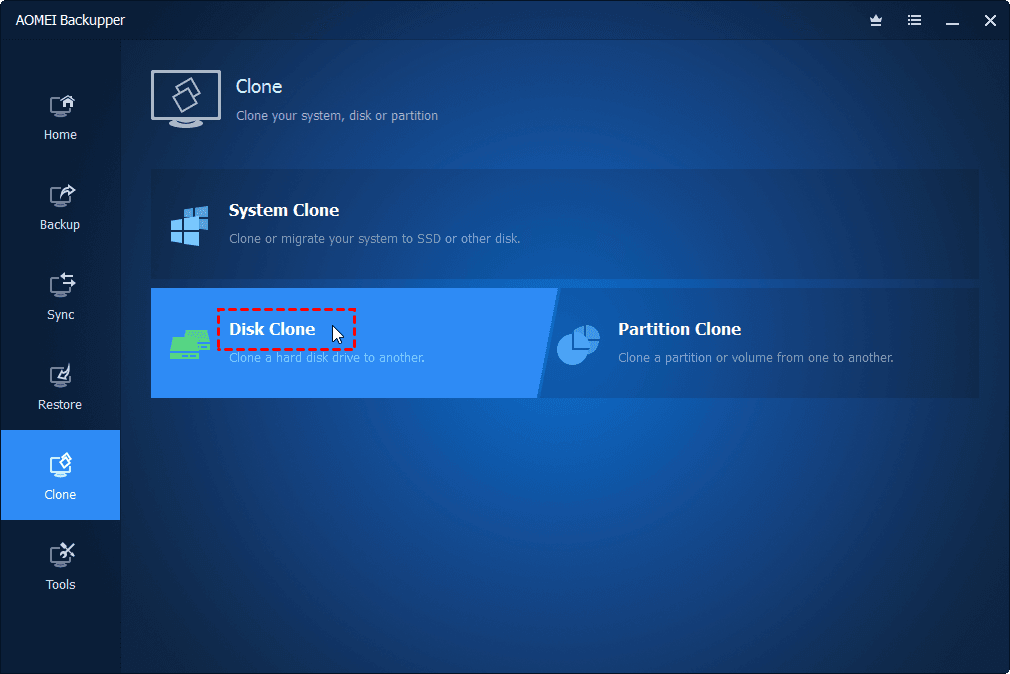
Step 2: Choose Disk Clone in AOMEI Backupper
Launch AOMEI Backupper, click ‘Clone‘ on the left-side menu, and select the ‘Disk Clone‘ option.
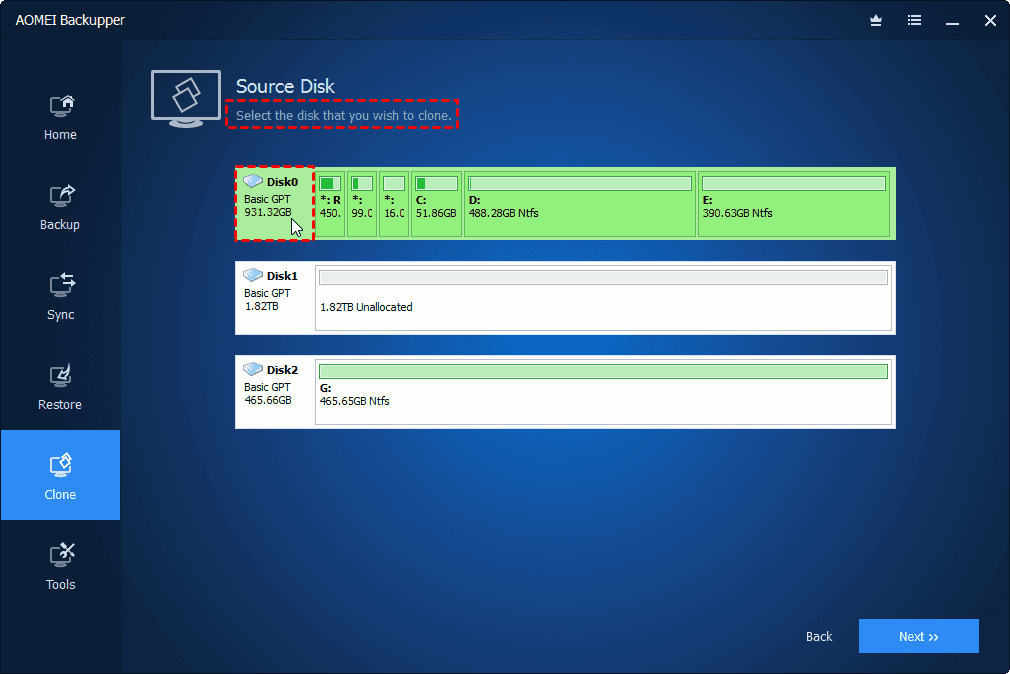
Step 3: Choose the source SSD
Pick the original SSD as the source disk and click ‘Next‘.
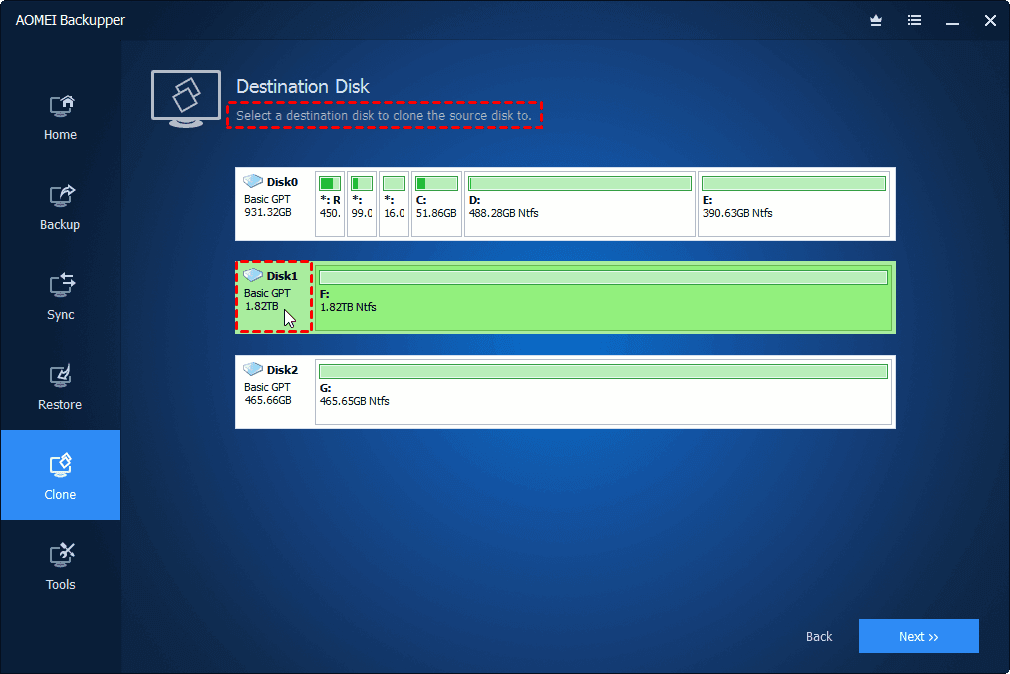
Step 4: Choose target SSD
Select the target SSD connected to your computer as the destination disk and click ‘Next‘.
Step 5: Make Full Use of Disk Space
In the Operation Summary page, click ‘Edit Partitions,’ then choose ‘Add unused space to all partitions‘ to utilize the storage space on the larger SSD fully.
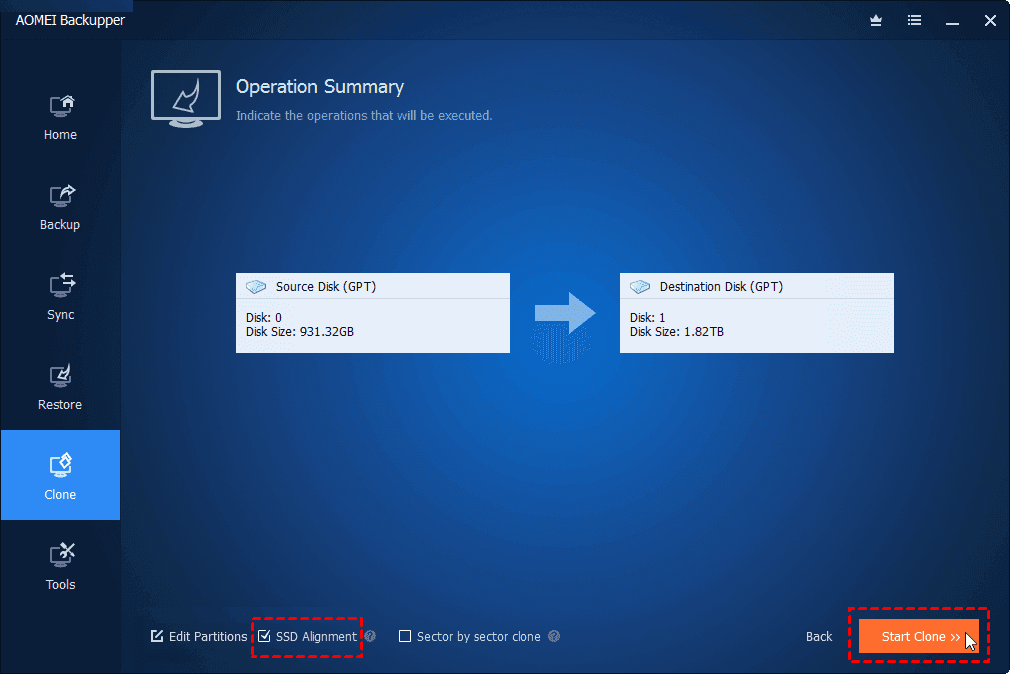
Step 6: Optimize SSD Performance and Start Clone
Enable ‘SSD Alignment‘ to enhance SSD performance. Confirm the operation and click ‘Start Clone‘ to initiate the cloning process.
In this page, we share the reasons to clone SSD to another SSD. And if you are searching ways to clone, AOMEI Backupper offers you the easiest way to clone an SSD to a larger SSD in Windows 11/10 and it is applicable to all kinds of SSDs, such as clone Windows 10 to NVMe SSD, clone SSD to larger SSD Samsung, clone HDD to Seagate SSD, etc. Additionally, you can utilize AOMEI Backupper Standard, the free backup tool to protect your data from loss. Now try it by yourself!
Lucas Noah, armed with a Bachelor’s degree in Information & Technology, stands as a prominent figure in the realm of tech journalism. Currently holding the position of Senior Admin, Lucas contributes his expertise to two esteemed companies: OceanaExpress LLC and CreativeOutrank LLC. His... Read more