
In this article, We have made a set of instructions to get Nandroid backup on any TWRP support device. In fact, the ecosystem of Android contains a lot of features. So. there are many practicable things due to its open-source software.
In order to prevent the users from making any adjustments, the manufacturer ships the device with a locked bootloader. therefore, its OS keeps safe all the time.
LOCKED BOOTLOADER
However, there are technicians with much interest who try to go deep and investigate what is underneath. They are looking for a locked bootloader. Thereafter, you are able to install any kind of custom ROMs and flash a custom recovery like TWRP. You can root the device through Magisk or else search a large number of components and structures.
A COIN HAS TWO SIDES
As you know, every good side has a bad effect. The same things go on to the above-discussed matter. On contrast, There will be always a probable danger when you try to make any changes to the device’s system partition and the root directory. In addition, the worst thing is you might be facing a boot loop if there is a simple mistake.
In normal situations, you can use an option like backup and restore. After all, all the features your phone possess does not make any value if the phone does not boot up.
THE BEST THING TO DO
What is the best thing when you face such a situation? Actually, there is a simple method you can try by yourself. In order to do that, You have to make the whole device backup. However, data boot and EFS partition (IMEI is there) should be included. So, We will follow the relevant steps, concerned with Nandroid backup.
The page content is as follows.
- Create and restore Nandroid Backup on any TWRP supporting device.
- Create a Nandroid Backup through TWRP Recovery
- Restore nandroid Backup through TWRP
- Sum up
CREATE AND RESTORE NANDROID BACKUP ON ANY TWRP SUPPORTING DEVICE
The backup made by TWRP is identified as the Nandroid Backup. There may be occasions, your device does not boot to the system but, it allows you to access this backup and restore all functions. Now, you are willing to meet the same criteria. However, there are some basic requirements to be fulfilled.
FIRST THINGS FIRST
First, switch off your device so that it will have an unlocked bootloader. At this stage, You must have installed a working TWRP recovery. By this time, you should have a significant amount of free capacity on your device. Now, You know how to create and restore Nandroid backup on any TWRP supporting device.
CREATING A NANDROID BACKUP THROUGH TWRP RECOVERY
Steps to follow
- First, start your device booting to TWRP recovery. You can use the hardware combination or else, use the below mentioned ADB commands.
- For the second option, You have to open the command prompt window in the flatform tool folder(it is one of Android SDK and flatform tools.) Next, need a connection to your device to PC through USB. (USB debugging should be enabled) Then, Give following orders.
- adb
- reboot
- recovery
2. Tap the Backup option( inside the TWRP recovery)
3. Next, You have to choose the partitions for backing up. We advise you to select all the partitions within there. There may be a full amount of data partition, However, it contains all the system data and apps installed earlier. it is better to select that too.
4. If you select Internal storage, by default, You can change the backup location. Tap the select storage, If you need a change and select Micro SD card or USB OTG. (only if supported)
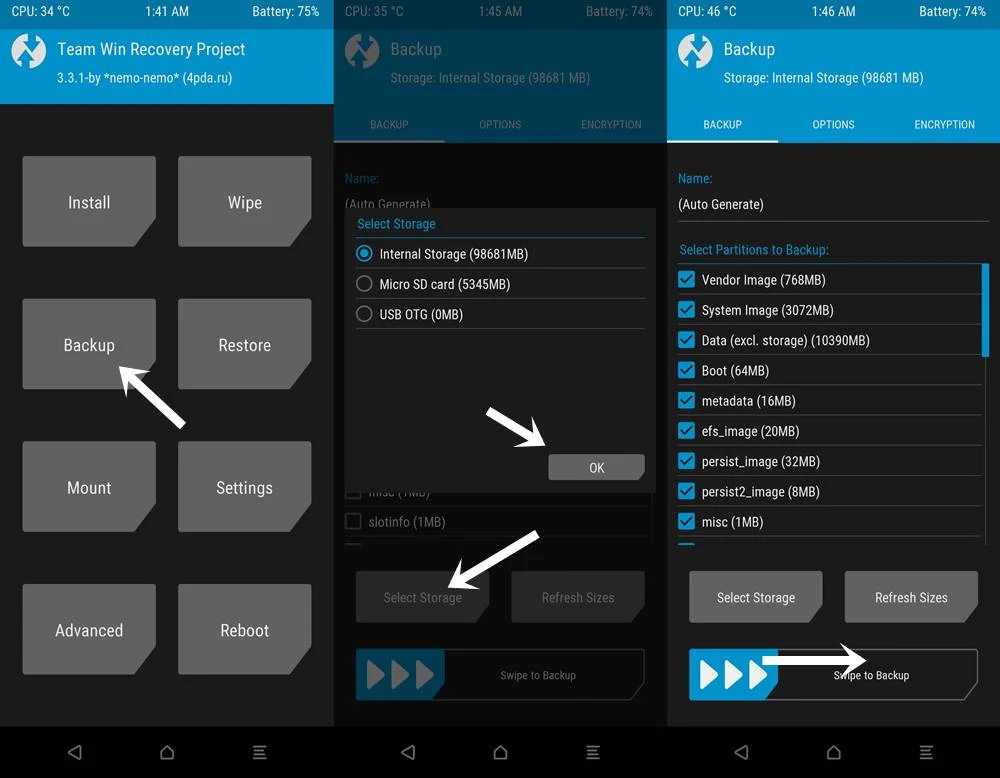
5. Yoy may have an idea to change the name of the backup. There is an Auto-generate keyword just right below the name field. tap it and enter the name you wish.
6. Swipe to right, on the swipe to backup option at the bottom, after selecting all the partitions. As a fact, a little time patience needs now. However, The time decides according to your partition’s size. As the data partition time consuming is much, the backup procedure runs for quite a lot of time.
7. Thereafter, you will see the message like this.
<Backup completed in xx seconds>
Now is the time for you to boot the device so that it will generate the system.

As you see, these are the steps required to generate a Nandroid backup via the TWRP recovery method. It is better to keep a copy of this backup on a pen drive or an SD card for future needs. Therefore, You must have a USB OTG cable to perform this. The reason is, if the device ends up in a boot loop or get bricks, it will be a difficult matter to access internal storage, due to the backup.
STEPS TO RESTORE NANDROID BACKUP VIA TWRP
Now is the time for you to check out the steps to restore these Nandroid Backups via TWRP recovery as the backup process is completed.
- Off, boot your device to TWRP first. It should be done throught hardware key compound. Otherwise, select fastboot mode. Then bring about the fastboot option by using the volume key. Then, the power key to confirm the selection.
- Tap on Restore, Inside the TWRP recovery. Choose your favourite Backup under Select Package to Restore. If you have store the backup in SD card or USB,tap on select storage and go to the relevant storage.
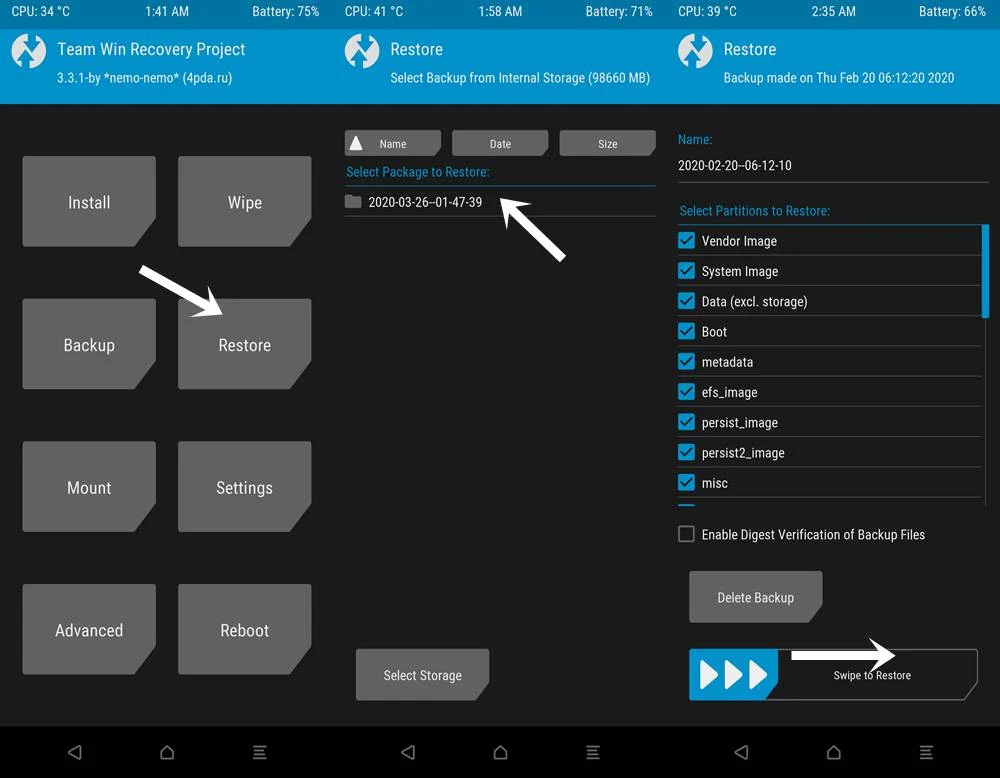
3. Now, you will have a confirmation stating that you have selected all the partitions to restore. Once finished, right swipe on the Swipe to Restore option and wait for some minutes.
4. It takes some time to restore the Nandroid via TWRP recovery. When finished, you can boot your device back and it will generate the system.
IN BRIEFF
Now, You have studies and know-how to create and restore the Nandroid backup created vis TWRP recovery successfully. Moreover, You are able to unlock the device bootloader and install TWRP. On the top of your bucket list, Nandroid backup should be there. In short, follow the above-mentioned guides to end up any time you a boot loop or brocked device. it will restore Nandroid Backup and the device will function properly.